こんにちは!馬場です。
私はエンジニアとしての経験がまだ浅く、学ぶことが多い毎日です。
今回は、Spring Bootを使用してシンプルなX(旧Twitter)風のポストアプリケーションを作成する手順を、開発メモとしてブログにまとめていきます。このシリーズでは、環境構築から始まり、各機能の実装までのプロセスを詳しく解説していきます。全3回のシリーズとして、以下の内容を予定しています。
- 環境構築編:開発環境のセットアップ方法を詳しく説明します。
- ログイン機能編:ユーザー認証とログイン機能の実装について解説します。
- ポスト機能編:基本的なポスト機能の実装について解説します。
環境構築編のゴール
この「環境構築編」では、以下のゴールを目指します。
- 開発環境の準備:必要なツールとソフトウェアのインストール
- Spring Bootプロジェクトの作成:基本的なSpring Bootプロジェクトの作成と設定
- 依存関係の設定:プロジェクトで使用するライブラリやフレームワークの設定
- 簡単なアプリケーションの起動:作成したSpring Bootアプリケーションをローカルで起動して確認
これらのステップを完了することで、次の「ログイン機能編」にスムーズに進むための基盤が整います。それでは、早速始めましょう。
環境構築
必要なツールのインストール
まず、Spring Bootの開発に必要なツールをインストールします。以下のツールが必要です。
- JDK(Java Development Kit):Java開発に必要なキットです。バージョン17を使用します。
- IntelliJ IDEA:Javaの統合開発環境(IDE)です。Community Editionで十分です。
- MySQL:データベースとして使用します。(本番環境用で使用)
1 JDKインストールJDKのインストール
- Oracle公式からJDK 17をダウンロードしてインストールします。
- 環境変数 JAVA_HOMEを設定し、JDKのインストールディレクトリを指定します。
2 IntelliJ IDEAのインストール
- JetBrainsのJetBrainsの公式サイトからIntelliJ IDEA Community Editionをダウンロードしてインストールします。
- インストール後、IDEを起動し、初期設定を行います。
- 必要な方は設定のプラグインから日本語言語化パックをインストールします。
3 MySqlのインストール
- 公式サイトからMySQLをダウンロードしてインストールします。
- mysqlに接続してデータベースを作成する。
Spring Bootプロジェクトの作成
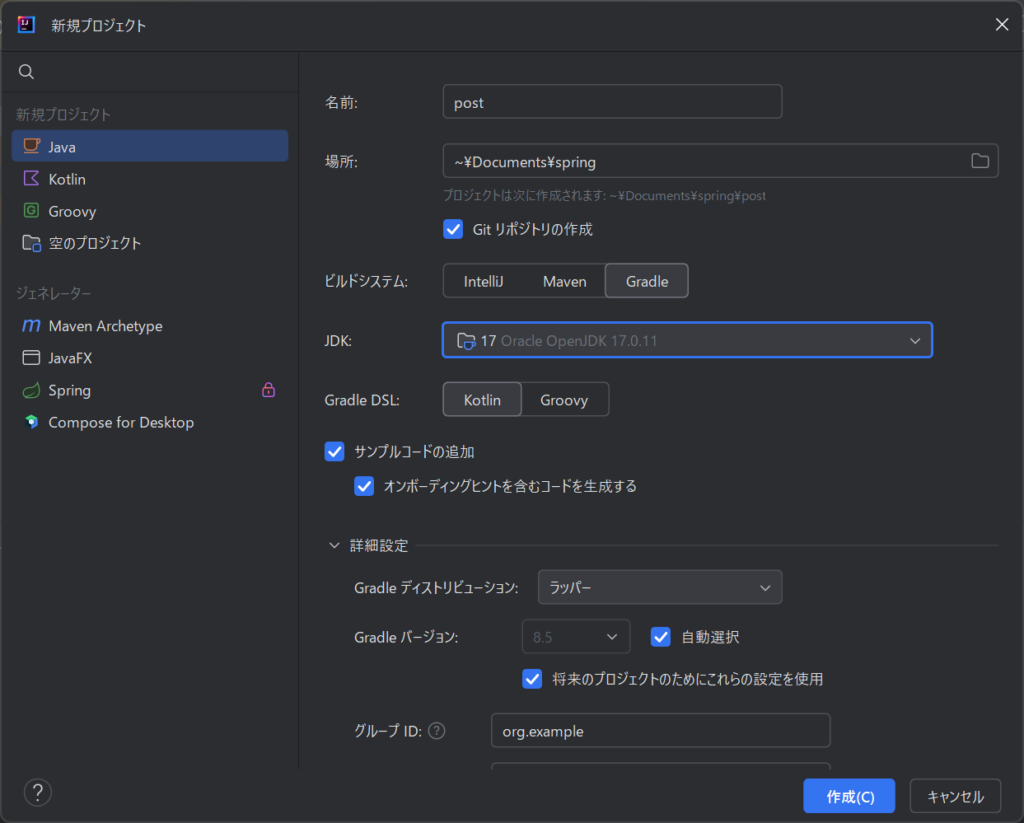
- IntelliJ IDEAを起動し、「新規プロジェクト」を選択します。
- 必要なプロジェクト設定を入力します:
ディレクトリ構造
Spring Bootプロジェクトの基本的なディレクトリ構造を確認しましょう。
テスト用(src/test)と本番環境用(src/main)ディレクトリの配置します。
Post/
├── src/
│   ├── main/
│   │   ├── java/
│   │   │      └── org.example/
│   │   │          │ └─controller/
│   │   │          │ └─model/
│   │   │          │ └─repository/
│   │   │          └──PostApplication.java
│   │   └── resources/
│   │       └── application.properties
│   └── test/
│       ├── java/
│       │    └── org.example/
│       │        │ └─controller/
│       │        │ └─model/
│       │        │ └─repository/
│       │        └──PostApplicationTests.java
│       └── resources/
│           └── application-test.properties
├── build.gradle.kts
└── gradlew
プロジェクトの設定
テスト用設定 (application-test.properties)
# H2 Database configuration
spring.h2.console.enabled=true
spring.h2.console.path=/h2-console

# DataSource Configuration - H2 Database (file-based)
spring.datasource.url=jdbc:h2:/data/db/testdb;DB_CLOSE_ON_EXIT=FALSE
spring.datasource.driverClassName=org.h2.Driver
spring.datasource.username=sa
spring.datasource.password=
spring.jpa.properties.hibernate.dialect=org.hibernate.dialect.H2Dialect
spring.datasource.initialization-mode=always

# Hibernate Configuration
spring.jpa.hibernate.ddl-auto=create-drop
spring.jpa.show-sql=true

# Logging Configuration
logging.level.org.example.repository=DEBUG
logging.level.org.springframework.security=DEBUG

# Thymeleaf Configuration
spring.mvc.hiddenmethod.filter.enabled=true
spring.thymeleaf.prefix=classpath:/templates/
spring.thymeleaf.suffix=.html
spring.thymeleaf.cache=false

# DevTools Configuration
spring.devtools.livereload.enabled=true

server.error.path=/error
spring.mvc.view.prefix=/WEB-INF/views/
spring.mvc.view.suffix=.jsp
本番環境用設定 (application.properties)
# DataSource Configuration - MySQL Database (for production)
spring.datasource.url=jdbc:mysql://localhost:3306/postdb?serverTimezone=UTC
spring.datasource.driverClassName=com.mysql.cj.jdbc.Driver
spring.datasource.username=tomoki
spring.datasource.password=posts
ing.jpa.properties.hibernate.dialect=org.hibernate.dialect.MySQL8Dialect

# Hibernate Configuration
spring.jpa.hibernate.ddl-auto=update
spring.jpa.show-sql=false

# Logging Configuration
logging.level.org.springframework=INFO
logging.level.com.example=INFO

# Thymeleaf Configuration
spring.mvc.hiddenmethod.filter.enabled=true
spring.thymeleaf.prefix=classpath:/templates/
spring.thymeleaf.suffix=.html
主な変更点
1 データベースの種類
- テスト用: H2インメモリデータベースを使用。
spring.datasource.url,spring.datasource.driverClassNameなどの設定がH2用になっています。 - 本番環境用: MySQLデータベースを使用。
spring.datasource.url,spring.datasource.driverClassName,spring.datasource.username,spring.datasource.passwordなどの設定がMySQL用になっています。
2 Hibernateの設定
- テスト用: データベーススキーマを起動時に作成し、シャットダウン時に削除するように設定
(spring.jpa.hibernate.ddl-auto=create-drop) - 本番環境用: 既存のデータベーススキーマを更新するように設定
(spring.jpa.hibernate.ddl-auto=update)
3 SQLの表示
- テスト用: SQL文をコンソールに表示する設定(
spring.jpa.show-sql=true)。 - 本番環境用: SQL文の表示をオフにする設定(
spring.jpa.show-sql=false)。
4 ログ設定
- テスト用: リポジトリのデバッグログを有効にする設定
(logging.level.org.example.repository=DEBUG) - 本番環境用: スプリングとアプリケーションのログレベルをINFOに設定
(logging.level.org.springframework=INFO,logging.level.com.example=INFO)
依存関係の設定
1 IntelliJ IDEAがプロジェクトを生成した後、build.gradle.ktsファイルを開いて、次のように設定します:
plugins {
    id("java")
    id("org.springframework.boot") version "3.2.2"
    id("io.spring.dependency-management") version "1.1.5"
}

group = "org.example"
version = "1.0-SNAPSHOT"

java {
    sourceCompatibility = JavaVersion.VERSION_17
    targetCompatibility = JavaVersion.VERSION_17
}

repositories {
    mavenCentral()
}

dependencies {
    // テスト用の依存関係
    testImplementation(platform("org.junit:junit-bom:5.10.0"))
    testImplementation("org.junit.jupiter:junit-jupiter")

    // LombokとSpring Boot DevTools
    compileOnly("org.projectlombok:lombok") // Lombok:ボイラープレートコードを減らすため
    annotationProcessor("org.projectlombok:lombok")
    developmentOnly("org.springframework.boot:spring-boot-devtools") // Spring Boot DevTools:ホットスワップや開発ツールのため
    testImplementation("org.springframework.boot:spring-boot-starter-test") // Spring Boot Starter Test:Spring Bootのテストをサポート

    // Spring Boot WebとThymeleaf
    implementation("org.springframework.boot:spring-boot-starter-web") // Spring Boot Web Starter:Webアプリケーションを構築するため
    implementation("org.springframework.boot:spring-boot-starter-thymeleaf") // Thymeleaf:サーバーサイドテンプレートエンジン
    implementation("nz.net.ultraq.thymeleaf:thymeleaf-layout-dialect:2.5.3") // Thymeleaf Layout Dialect:レイアウトとフラグメント機能をサポート
    implementation("org.webjars:jquery:3.5.0") // jQuery:JavaScriptユーティリティ
    implementation("org.webjars:bootstrap:4.4.1-1") // Bootstrap:レスポンシブデザインとスタイリングのため

    // MySQLデータベース(本番環境用)
    runtimeOnly("mysql:mysql-connector-java:8.0.28") // MySQL Connector:MySQLデータベースに接続するため

    // H2データベース(テスト用)
    testRuntimeOnly("com.h2database:h2") // H2データベース:テスト用のインメモリデータベース

    // Spring Boot Starter Data JPA
    implementation("org.springframework.boot:spring-boot-starter-data-jpa") // Spring Data JPA:JPAを使用してリレーショナルデータベースと対話するため

    // javax.persistenceをjakarta.persistenceに置き換え
    implementation("jakarta.persistence:jakarta.persistence-api:3.1.0") // Jakarta Persistence API:JPA API仕様

    // JetBrainsアノテーションを追加
    implementation("org.jetbrains:annotations:24.0.1") // JetBrainsアノテーション:null安全性のためのアノテーション

    implementation("org.springframework.boot:spring-boot-starter-security") // Spring Security:認証と認可のため
    implementation("org.springframework.boot:spring-boot-starter-jdbc") // Spring JDBC:JDBCサポートのため
}

tasks.withType {
    systemProperty("spring.profiles.active", "test")
}

tasks.test {
    useJUnitPlatform()
    systemProperty("spring.profiles.active", "test")

    reports {
        junitXml.required.set(true)
        html.required.set(true)
    }
}

tasks.register("printRuntimeClasspath") {
    doLast {
        println(sourceSets["main"].runtimeClasspath.asPath)
    }
}
2 ↓右上に「スクリプト構成のロード」と「Gradleの変更を読み込む」が出てくるので選択
アプリケーションの起動
1 ポストアプリのテストを実行する
テストクラスの作成
PostApplicationTestsクラスを作成し、Spring Bootアプリケーションのテストを実行します。
このクラスには、@SpringBootApplicationアノテーションが付いており、Spring Bootアプリケーションのエントリーポイントとして機能します。
package org.example;

import org.springframework.boot.SpringApplication;
import org.springframework.boot.autoconfigure.SpringBootApplication;

@SpringBootApplication
public class PostApplicationTests {
    public static void main(String[] args) {
        SpringApplication.run(PostApplicationTests.class, args);
    }
}
2 プロジェクトの実行確認
IntelliJ IDEAの右にある「Gradle」から「bootTestRun」を右クリックして実行します。
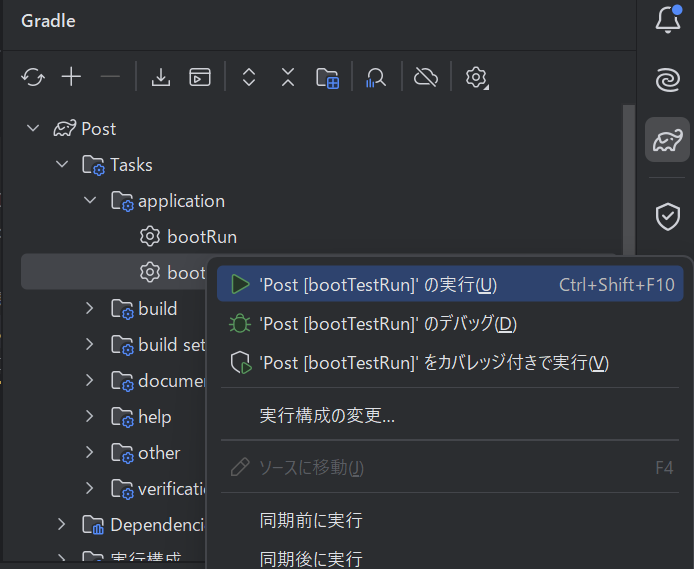
コンソールを確認し「bootTestRun」プロジェクトは正常に起動されていることを確認する。
18:34:56:  'bootTestRun --scan --stacktrace' を実行中...

Starting Gradle Daemon...
2024-07-07T18:35:22.273+09:00  WARN 6440 --- [           main] org.hibernate.orm.deprecation            : HHH90000025: MySQL8Dialect does not need to be specified explicitly using 'hibernate.dialect' (remove the property setting and it will be selected by default)
2024-07-07T18:35:22.274+09:00  WARN 6440 --- [           main] org.hibernate.orm.deprecation            : HHH90000026: MySQL8Dialect has been deprecated; use org.hibernate.dialect.MySQLDialect instead
2024-07-07T18:35:22.674+09:00  INFO 6440 --- [           main] o.h.e.t.j.p.i.JtaPlatformInitiator       : HHH000489: No JTA platform available (set 'hibernate.transaction.jta.platform' to enable JTA platform integration)
2024-07-07T18:35:22.681+09:00  INFO 6440 --- [           main] j.LocalContainerEntityManagerFactoryBean : Initialized JPA EntityManagerFactory for persistence unit 'default'
2024-07-07T18:35:22.719+09:00  WARN 6440 --- [           main] JpaBaseConfiguration$JpaWebConfiguration : spring.jpa.open-in-view is enabled by default. Therefore, database queries may be performed during view rendering. Explicitly configure spring.jpa.open-in-view to disable this warning
2024-07-07T18:35:23.100+09:00  INFO 6440 --- [           main] o.s.b.w.embedded.tomcat.TomcatWebServer  : Tomcat started on port 8080 (http) with context path ''
2024-07-07T18:35:23.113+09:00  INFO 6440 --- [           main] org.example.PostApplicationTests
3「http://localhost:8080」に接続
localhostの接続しようとすると下記のエラーが発生してしまいます。
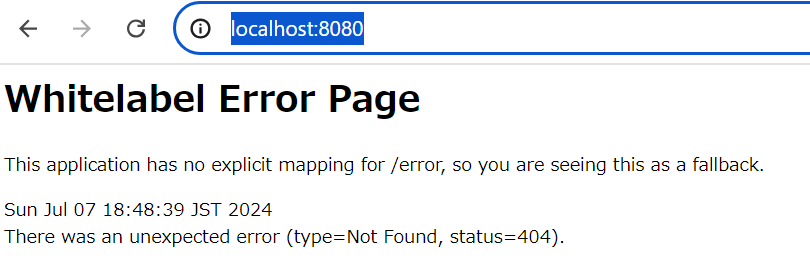
Spring BootのWhitelabel Error Pageの解決方法
Whitelabel Error Page は、リクエストされたURLに対する明示的なマッピングがアプリケーションに存在しない場合に表示されます。このエラーページは、特に開発環境で便利ですが、本番環境では独自のエラーページを設定したい場合があります。
解決方法
1 コントローラの作成
まず、URLマッピングを行うコントローラを作成します。例えば、/ にマッピングされたエンドポイントを持つコントローラを作成します。
package org.example.controller;

import org.springframework.stereotype.Controller;
import org.springframework.web.bind.annotation.GetMapping;

@Controller
public class HomeController {

    @GetMapping("/home")
    public String home() {
        return "home"; // templates/home.html に対応
    }
}
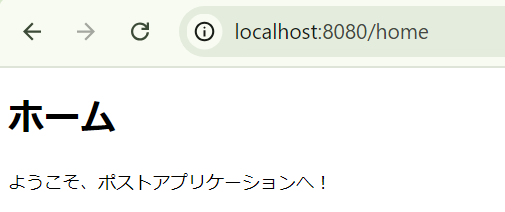
/home にアクセスすると home という名前のテンプレートを返します。テンプレートファイル home.html を src/main/resources/templates/posts フォルダに作成します。
<!DOCTYPE html>
<html lang="ja">
<head>
    <meta charset="UTF-8">
    <title>ホーム</title>
</head>
<body>
<h1>ホーム</h1>
<p>ようこそ、ポストアプリケーションへ!</p>
</body>
</html>
2 エラーページのカスタマイズ
本番環境では、独自のエラーページを設定することが推奨されます。Spring Bootでは、カスタムエラーページを簡単に設定できます。
まず、src/main/resources/templates フォルダに error フォルダを作成し、その中にエラーページテンプレートを配置します。
<!DOCTYPE html>
<html lang="ja">
<head>
    <meta charset="UTF-8">
    <title>ページが見つかりません</title>
</head>
<body>
<h1>404 - ページが見つかりません</h1>
<p>お探しのページは存在しません。URLを確認してください。</p>
<a href="/">ホームに戻る</a>
</body>
</html>
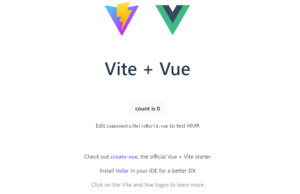
上記設定できたら再ビルドし、「http://localhost:8080」に接続します。
下記のように問題なく接続することができました!
まとめ
今回のブログでは、Spring Bootを使ってポストアプリを作成するための開発環境の構築方法について説明しました。JDK、IntelliJ IDEA、MySQLのインストールから、Spring Bootプロジェクトの作成、必要な依存関係の追加、プロジェクトのビルドと実行までの手順を簡単に解説しました。次回からは、ログイン機能と基本的なポストの投稿機能を実装していきますので、お楽しみに!